So I finally succumbed and bought a new camera in preparation for my next adventure in Japan. I very had nearly forsaken my photographic preferences for a Point and Shoot camera, but luckily at the last minute I found the wonder of the Ricoh GX100.
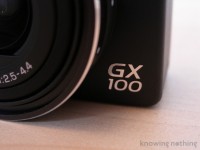 This is a compact camera made for photographers, by photographers (or so I hear), but has many features that are usually only found on D-SLR cameras (Digital Single Lens Reflex – the big cameras with interchangeable lenses). So now I can take my little GX100 with me wherever I go and still have the flexibility to do a bit of creative photography when I don’t just need to take snaps of friends at the latest gathering.
So what was *my* reason for a new camera? That should be the question everybody asks themselves on the road to forking out a hefty wad of dosh. My camera history includes an old Ricoh SLR, the Olympus C-5060z and the Olympus C-7070z (because the former got stolen). While my C-7070z takes great pictures (the pictures of the GX100 in this review are taken by it), there are two main issues I have with it. One, recently when I power on, it turns itself off and on in succession several times, almost as if ‘warming up’ which leads to much frustration and many missed shots. Two, the camera, compact though it already is, it not compact enough. It still requires its own shoulder strap style camera case. In the end, this meant I didn’t take it out with me much unless I went out with the sole aim of taking pictures (which wasn’t often). Hence, I needed a pocket-sized camera I could happily taken with me at a moment’s notice. But at the same time, I didn’t want to sacrifice the ‘fun’ in photography which, for me, involves playing with settings and experimenting with picture taking. A P&S camera would destroy all that with its ‘smart’ auto-everything.
The guy over at Luminous Landscape in his Canon G9 review said it for me:
The only great camera is the camera that’s there with you when the light happens.
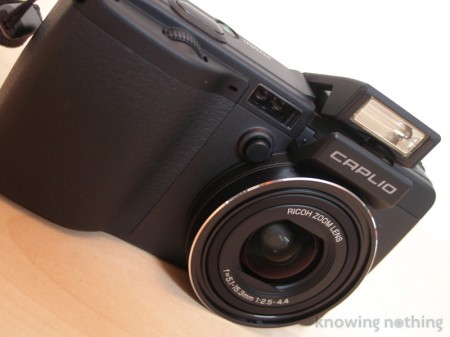
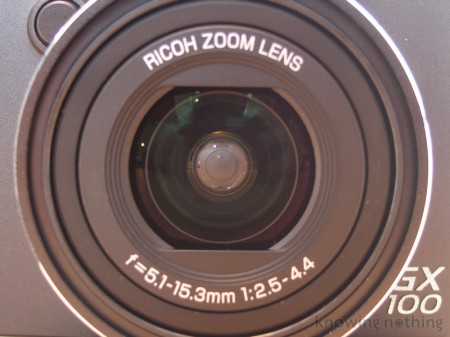
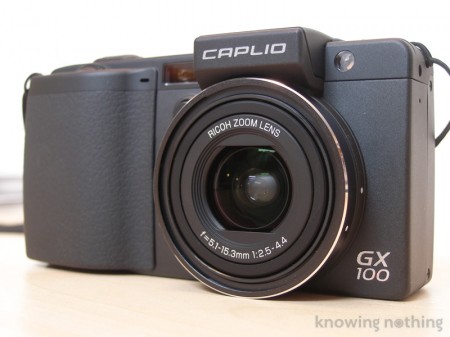
First up, I should mention that this isn’t going to be a technical review of sorts. I’ve listed some good reviews at the bottom of this post for that matter. Rather, I just want to give my impressions of this camera and some sample pictures. I’ll probably update it as time goes by as well. So, the Ricoh Caplio GX100 has a 10 megapixel CCD and a 24-72mm lens (F2.5-4.4 aperture) as well as RAW DNG support. Here it is:
You can see the large grip and pop up flash. Unlike most compact cameras, this one feels great to hold. It sits in your hand snugly and doesn’t slip. You feel like you’re still *doing* photography, but that may only make sense for people who have used SLR cameras. For the average consumer though, it’s just better grip than other P&S cameras. The pop up flash is interesting. You press a button to the side of it to flip it up. I can only speculate at why it is in this position, but my best guess would be that it avoids the notorious problem of ‘white spots’ in the pictures. Usually when the flash is close to the lens, white spots appear due to the light from the flash. Again, this is only my guess. I haven’t seen white spots in my pictures yet.
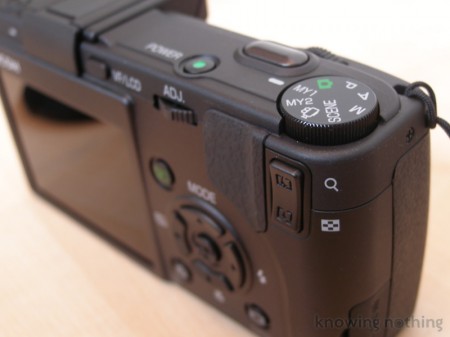
The above picture shows the menu layout on the Ricoh GX100. Notice the lack of a viewfinder and large screen in its place. There is an optional viewfinder which sits in the hotshoe sync (for attaching external flash devices – another useful feature), but it costs about an extra £100 so I didn’t buy it. But it is worth noting that if you like ‘traditional’ photography and looking through a viewfinder, it is possible to do so with this camera. Notice also the rubberised grip next to the zoom function – this allows your thumb to sit comfortably while holding the camera. The ‘ADJ’ dial and the dial by the shutter button allow you to alter the shutter speed and aperture in manual mode – really quick and easy to use! The program dial on top is a little tricky to turn, but it has two ‘My’ functions. This allows you to save your favourite settings to use them quickly every time. I set one to Aperture priority Jpeg shooting and one to Manual Raw mode shooting, both with an exposure compensation of -0.3 and a slight increase of saturation and decrease of contrast – again, just personal preferences, but it shows that you can tweak the settings to take your pictures as you like them.
The actual settings menu is really, really easy to navigate. My old Olympus wasn’t bad by any means, but the Ricoh menu takes the cake. I don’t need to enter the menus much, as I use my own settings on the ‘My’ mode, but even when I do, it takes no more than a few seconds to change the setting I need to. This is something that needs to be tried in store to appreciate. If you’ve ever become frustrated at the menus on cameras being too complicated, you might find this a breath of fresh air. Also, as mentioned the camera sports Aperture Priority mode (setting the aperture – controlling the amount of light hitting the sensor – and having the shutter speed selected automatically), as well as full Manual and Program modes. No Shutter Priority though (setting the speed the picture is taken and having the camera select the aperture). I tend to find myself working in full manual mode most often recently. It’s been a while since I’ve done that and photography became a lot more fun because of it! Another great feature I’d never used before but now use everyday is the live histogram feature. I can’t believed I ever lived without this! The camera also has a grid feature, which divides the image up into thirds to aid your composition!
Basically in the histogram, the left side of the image shows shadows, the right hand side shows highlights and the middle shows midtones. If you over-expose your image, the highlights become ‘clipped’, meaning the camera cannot capture the full tonal range because the scene is too bright and you will have bleached-white areas. Vice-versa, if the image is underexposed, the dark areas appear as deepest black. Dpreview have a clear explanation of how the histogram works. Take a look! Histogram explanation
There are the pre-programmed scene modes such as portrait, night mode (etc.) but I don’t use these. There is also a bizarre mode that allows you to correct the skew (the angle of the picture). It’s used when taking pictures of other pictures and posters (etc.) so that, if you get the angle incorrect you can correct it to a nice, square image. I haven’t used it yet, but I imagine if you need to take pictures of information (such as bus timetables and such), it could be very handy. Also interesting is the ability to take sequential shots and stitch them together. Basically, the camera takes lots of small pictures and puts them together like a sop-motion slide show. Useful if you’re into animation and want to capture movements body positions in order to see the flow, but also just for having fun. You can also shoot in square format (1:1) like medium-format cameras which allows for another creative dimension.
I mentioned the raw mode briefly. This is very important on high end cameras as it allows you to shoot in better detail and they are easy to correct afterwards. In other words, you can take the images shot in raw mode into Photoshop or other similar programs and correct things like the exposure, saturation, brightness (etc). By shooting directly in Jpeg format, you automatically lose some of the detail in the picture. But, for those who are not into post-processing of photos, I’m happy to say that the Jpeg mode offers great images anyway. I find it hard to match the Jpegs when I try to correct my raw images, but that says more about my ability as a photographer than anything else. I still have a lot to learn. With the latest high speed SDHC memory card (I bought a Sandisk Extreme III SD 4GB Card – the maximum capacity this camera can take), shooting raw takes about 4 seconds to save each picture. This is unacceptable for some people, but I haven’t found it a problem yet. I was out shooting in raw format for the whole day just recently in Whitby (including taking pictures of friends) and I wasn’t bothered by the small time lag. That said, you certainly can’t take pictures in raw mode in quick succession with this camera, so it’s best to use it for composing good pictures and taking your time (which I find actually helps me to think about the composition more!) Also, the raw mode pictures take a noticeably longer time to save without a good memory card. I tried a standard SD card while I was waiting for my Extreme III card to arrive and it took around 2 or 3 seconds more to save each picture. So definitely worth buying a fast memory card!
Low light photography has always been the bane of my life with digital cameras. I recently found out why. Basically, the sensors in these sort of compact cameras are small. The smaller the sensor, the more noise (you can see the pixels in the image) which isn’t pleasant for most people. D-SLR cameras have much bigger sensors (bigger chips) and so can take good quality pictures up to much higher ISO settings. ISO is the speed of the ‘film’ (in traditional cameras), so ISO 80 is a slow speed film with a fine grain (you can’t see the pixels), and so good for bright, sunny situations as it requires more light. ISO 1600 (for example) is a much faster speed film and so good for fast-moving objects and low light situations. But the compromise is that the pictures become ‘grainy’ (you can see the pixels).
As noted elsewhere, with the Ricoh GX100, anything over ISO 400 is reputed to be unusable as the noise is too high. ISO 400 is acceptable, I feel, and has a rather nice grainy, ‘rustic’ quality to it. ISO 80-200 are fine, but I almost always shoot in ISO 100 for good quality pictures. You’ll need a tripod for night photography, but this camera also has the camera shake correction technology to neutralise the shake from your hands. I find this works quite well and I can take better pictures with no flash indoors. The flash, I’m sorry to say, isn’t so good. It was corrected a little with a firmware update this March and is acceptable now, but without the firmware it’s far too bright in low-light situations. Alas, there is no flash EV correction function either (to control the strength of the flash – something that I used often on my Olympus), so I’m a little disappointed with that. It does have a ‘soft-flash’ setting though. The again having said all that, flash pictures from compact cameras in general look awful anyway without an external flashgun, so I don’t use flash much.
An area that this camera excels in is street photography. I took the camera through its paces the other day on a bright, sunny afternoon in Leeds. Shooting both in aperture priority and manual in Jpeg format, I could snap snap snap away casually and get sharp, colourful images back. Definitely something to consider if you like this sort of photography! There is also a ‘snap’ setting which uses the hyperfocal point to remove the lag in automatic focus. Basically this means the camera only focuses at a certain point, but much more of the picture is actually in focus due to the depth of field. This enables you to take photos out on the street really quickly and get them coming back sharp!
Yet another area it excels is in Black and White photography. The aforementioned grain is a bonus here as the images take on a gritty look. I’ve found myself starting to take more black and white photographs with this camera and enjoying it.
I haven’t used the macro mode much yet, but I do like macro photography, so I’m happy this camera has a great macro mode (1cm in wideangle and 4cm in telephoto). Coupled with manual focus (at the touch of a button, I might add!), it’s great for close-up work. The camera also has a movie mode, but he quality is only average in my opinion. The 24mm wideangle lens is not to be sniffed at. I’ve always gone for wideangle lens cameras (usually 28mm), as I find they just offer so much more flexibility in photography. So using a 24mm lens has been even better! It has a little barrel distortion at the full 24mm, but it’s easily correctable in Photoshop with a plugin like Ptlens. I’d happily trade off the telephoto (long) end of the lens for extra width, and that’s exactly what I did. 72mm at the telephoto end of the lens is short, so don’t think about zooming in especially far with this camera. It’s all about getting up close. I’ve found though that I’d ideally like a little more in the telephoto end or a larger aperture at telephoto to give a better bokeh effect (the blurring of the background/foreground). Oh well, I guess I can’t have it all.
Battery life is moderate. A full day’s shooting lasts, **very approximately**, 6 or 7 hours with the camera on all the time. I bought a second lithium battery, but it’s worth noting that the camera takes 2 AAA batteries for those times you are in a pinch (though I doubt they would last long).
**********
Dust Problem
Some people have reported problems with this camera (among others) that dust gets into the sensor during normal usage. This results in dark spots or blotches in pictures. The only solution has been to send the camera back to Ricoh for cleaning, but I found this novel thread a while ago that claims to have a solution for dust problems on a similar camera. Sucking! Maybe it will work for the Ricoh? I don’t now if it’ll get dust off the sensor, but give it a try if you’re having problems. I’ll just have to pray I don’t have them at some point in the future.
I’ll copy and paste the content that ‘Dunakeszi’ wrote:
Hello All,
coming back from a London vacation I also experienced dust between the lens elements of my G7. Needless to say I’ve been hating Canon since then but after reading all the articles about this topic in the net I just found the SOLUTION at least for my own camera: :)
#1)-I removed the silver ring around the lens, turned the camera on and set the lens to FULL telephoto, then cleaned carefully ALL the visible dust particles around the lens and the front of the camera. Take the time to make a nice job here! No any impurity should remain around the lens!
#2)-When it was done, I set the lens to wide angle, then I put front of the lens into my mouth (don’t laugh! :), closing it carefully around with my lips.
After that I sucked the air slowly-continuously for couple of seconds thru the lens letting the air in the lens around the lens that I cleaned to spotless before as wrote!!
The result:
-No any dust particle can be seen on/in the lens now!IMPORTANT!!!
-If you don’t clean the cam. BEFORE sucking the air thru the front of the lens you can even suck more dust in the camera!
-DO NOT throw air thru, ONLY suck!! The moisture you breath out can make it even worse!
Guys, I hope I could help to all of you!
Good luck!Regards:
Dunakeszi
**********
Red Skies at Night review – Great review!
Phototropic review – Great video included in this review. It really gives you a feel for how compact and small this camera is!
Another review with sample pictures
Northlight Images review



thanks for the advice, its actually works!!
I am intresting it.
http://www.newbatterycharger.co.uk/nied-battery-charger-panasonic-dmc-tz4.htm
Oh did you get your uni results by the way?
Oh did you get your uni results by the way?
Hey mike is that a flash program your using for those photos?
Hey mike is that a flash program your using for those photos?